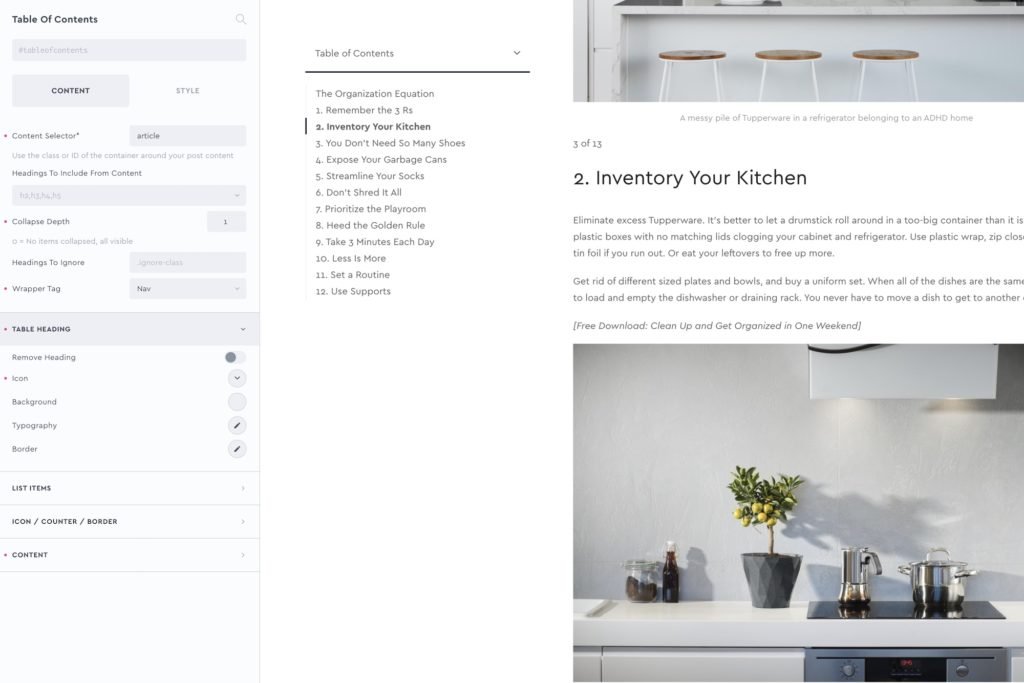
Table of Contents
- General
- Support FAQ
- Developer
This element allows you to add a collapsible table of contents to your templates, which will automatically pick out the headings from your chosen container on the page. It can be used anywhere, inside pages or templates.

Content selector – Add the selector for the container of the content. eg ‘.content’ and then give the article content the class ‘content’. Note – only one element can be used as the content. If you have multiple containers that contain headings that you want to include, use a parent selector that contains both containers. The table of contents element will find the headings.
Heading selectors – Choose which headers to pick out of the content for the table. Default is h2,h3,h4,h5
Ignore selectors – If you have some heading inside the content that you do not wish to be included in the table, give them a class and add that as an ignore selector.
Collapse depth – This controls how many levels of headings are collapsed by default. If you’re creating an inline table of contents, it’s best to set this to 0 to make sure none of the headings are collapsed. If you’re using sticky or fixed positioning and have a lot of content, it would be better to collapse some of them initially, so they only reveal as you scroll past those headings.
Table Heading
Remove heading – The table can be collapsed by clicking on the table heading. The heading is optional and can be removed.
Icon – Change the ‘down arrow’ icon and size. Initially the size is inherited from the font size of the header text.
List Items
Customise the typography of at each heading level, add indents and control the spacing between each of the list items.
If you’re not using the border style for the table of contents, you can set a number of columns for the lists to take up, which can be useful if using the table inline where you want the lists to take up more horizontal space.
Note – Any active styles can only be applied to one table of contents element on the page, as it needs to monitor the scroll position to apply the active styles. Generally, we would only recommend adding one table of contents to any page. If you do need to add multiple, it will pick up the headings and link to the content, but you wouldn’t be able to take advantage of the active styling as the user scrolls
Content
Smooth scroll offset – If using a sticky header, adding an offset to the smooth scroll will make sure the headings are visible and readable when they’re scrolled to rather than being hidden underneath the header.
Add unique IDs to content headings – Instead of adding IDs to all headings inside your content, enabling this setting will do it for you and give each header found inside the content a unique ID.
ID prefix – By default, the IDs given to the headings are prefixed ‘heading-‘ and then the number from the ID of the table of contents component. Each heading is incremented to make sure they’re unique. As well as changing the ID of the component, you can also change the prefix to something more relevant to your content.
Use heading text – this option will make sure any IDs that are added to headings will match the text inside the heading. For eg if the heading is ‘How to Ride a Bike’ the hashlink to scroll to that heading would be #how-to-ride-a-bike.
Counter / Border / Text
The three main layout types are to include counters, borders or just the text. The border makes sense for either a sticky or fixed-positioned table of contents as the border will select on the currently active.
The counter is useful for creating more of an ordered list.
Suffix and separators can be added to the counters to make it easy to add context to the list. eg “Q1” “Q1a” Q2″. or “Part I” “Part II” “Part III” etc. (Make sure to include the quotes, eg “.”).