Calendar
This element can be used inside query loops.
This element supports being used inside AJAX filtered content, either by Bricks’ native filter elements, WPGridbuilder, JetSmartFilters or PiotnetGrid
This element has it’s own interaction settings. Refer the interactions tab below for the list of element-specific triggers and/or actions.
This element support being used inside both components & nested components.
- General
- Getting Started
- Custom fields
- Interactions
- Developer
- Support FAQ
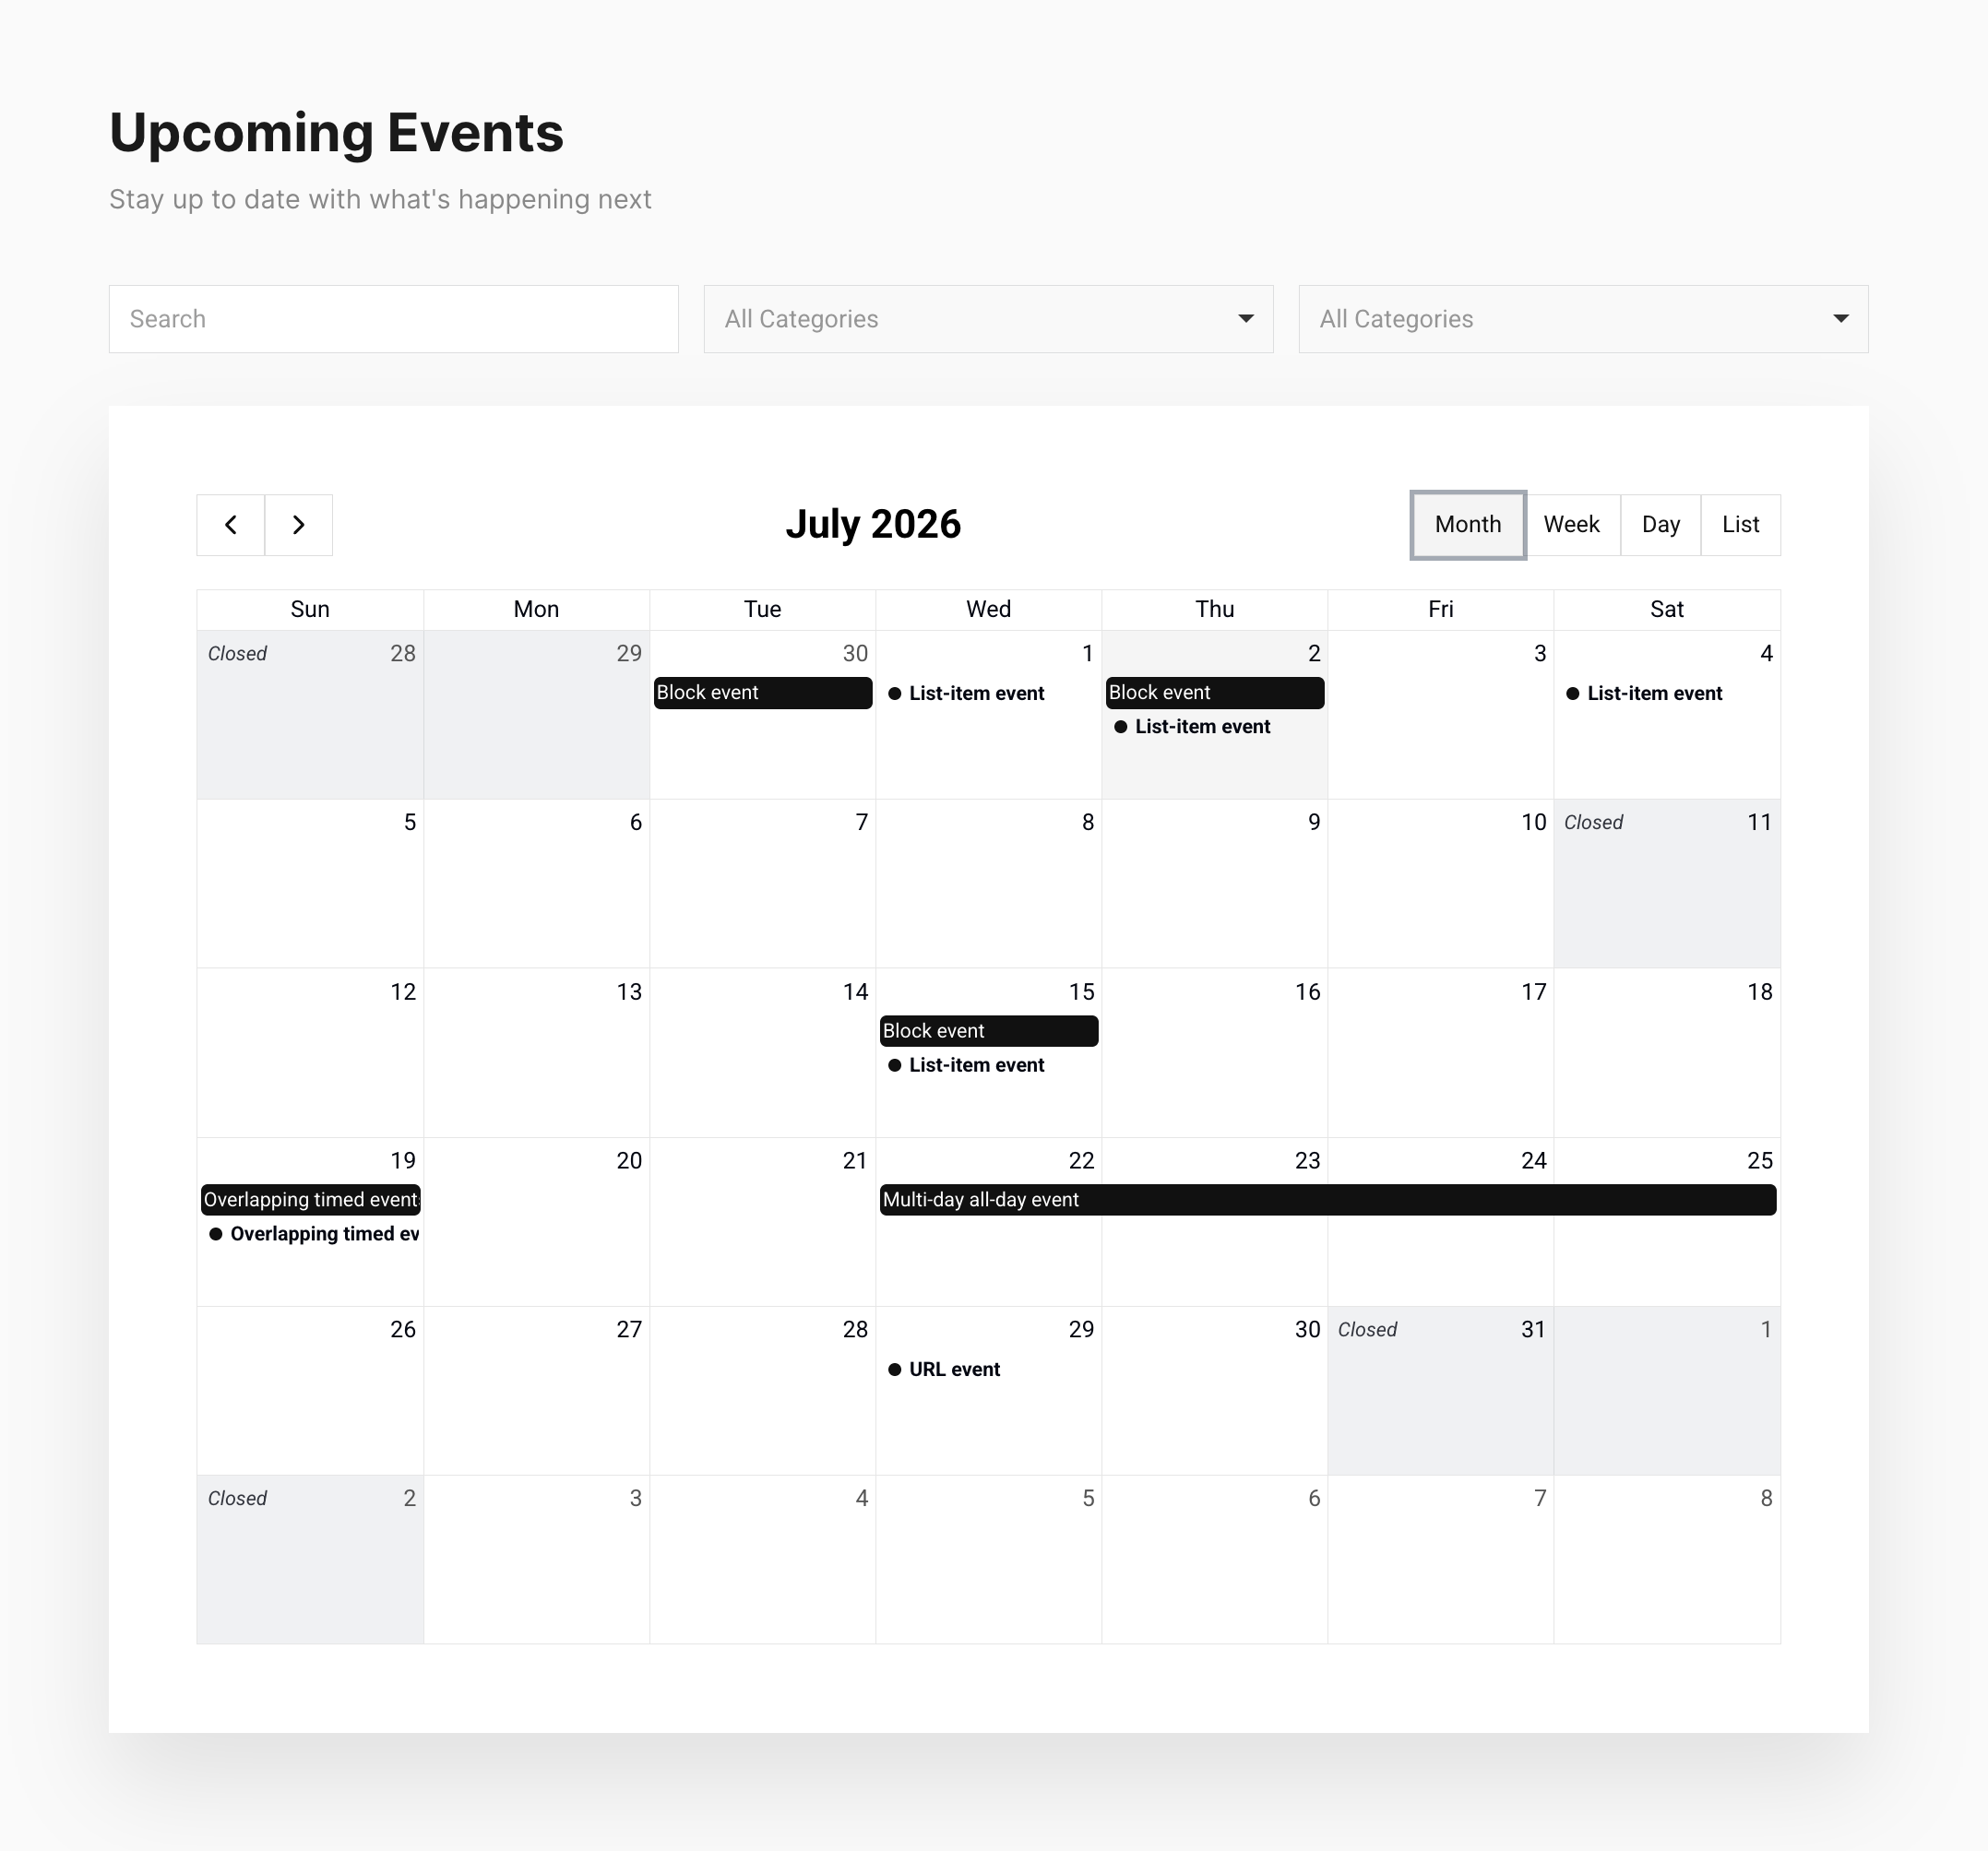
This element allows you to display any post type from a query loop as a simple calendar view. Site visitors can then navigate the calendar, switch between the views, filter the posts with Bricks’ filter elements & click to open a popup template for a ‘quick view’.
Spin up a sandbox site to see a few demos, using ACF & Bricks’ query loop to populate the calendar.
See the tutorial video on Youtube.
Using a Query Loop
Similar to the dynamic chart and dynamic table, this element will be getting all the data from Bricks’ query loop, and in this case then using those posts to display in the calendar.
The easiest way to get events into the calendar is to have a CPT and then use Bricks’ query loop to fetch the needed posts from that CPT. (Remember, with query loops the default ‘posts per page’ setting in bricks is 10, so will only show 10 by default. Change this to -1 to show all posts).
The event details; start time/date, end time/date, title, recurring frequency etc is all going to be coming from your posts and own custom fields using dynamic tags.
Using Bricks’ Filter Elements
A major benefit of populating the calendar with posts via Bricks’ query loop is that Bricks’ own filter elements can be used to target the calendar and filter the posts by taxonomies, custom fields or by search input.
Choose your calendar element as the target query in the filter element settings.
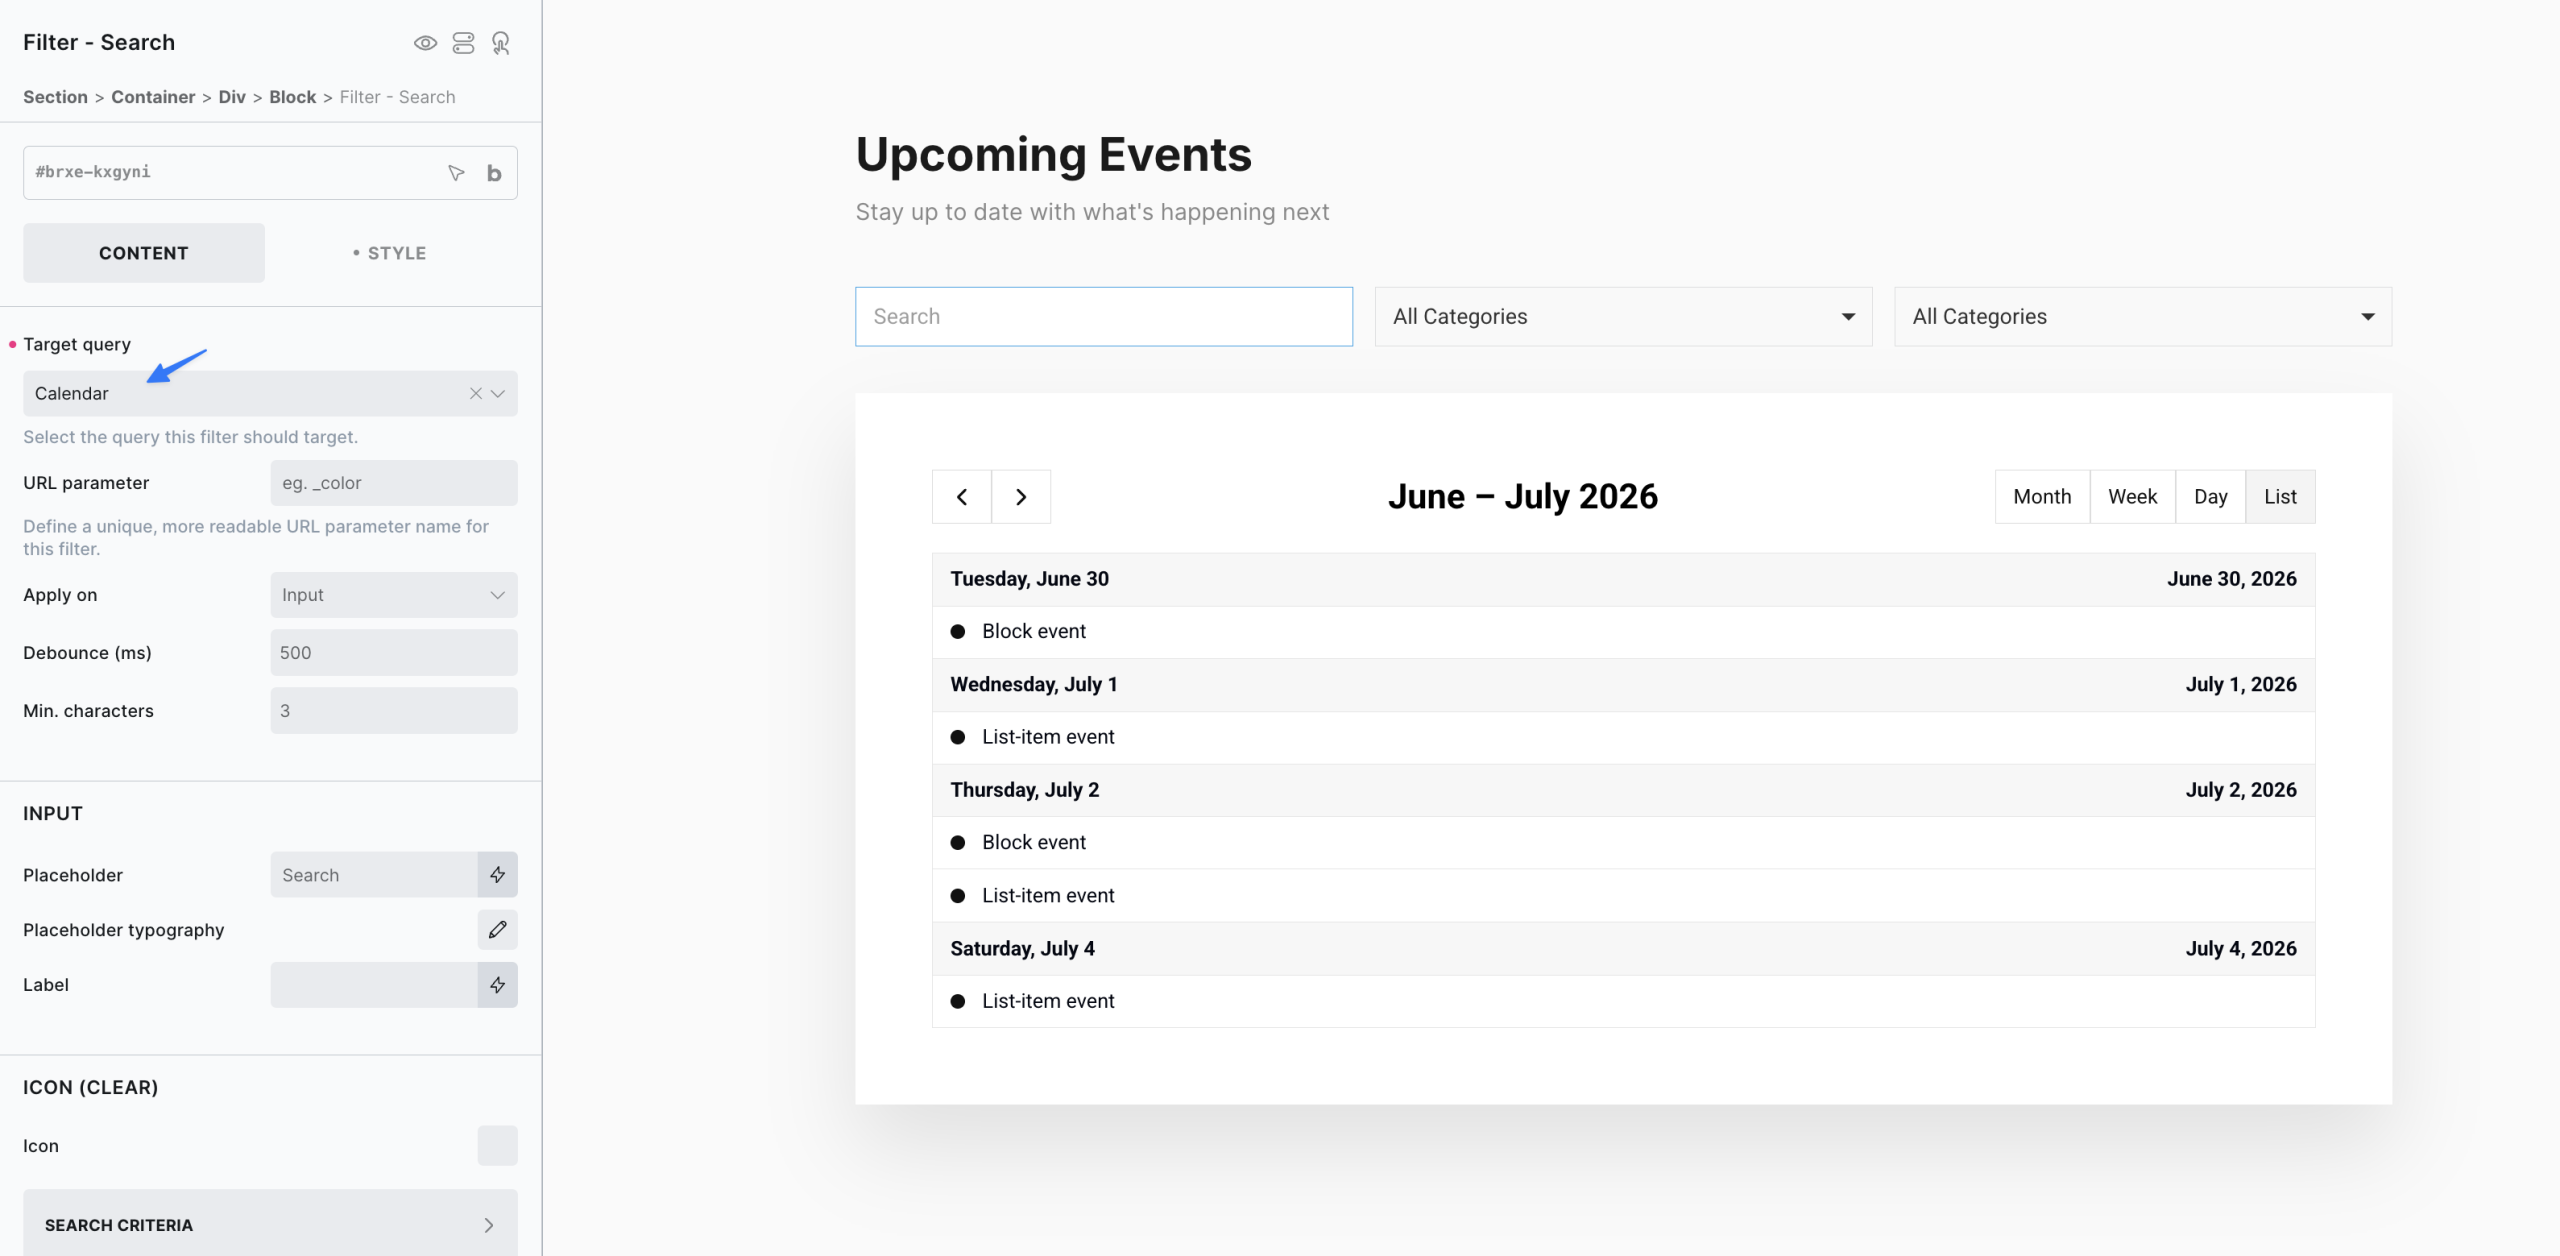
The filter elements will handle the filtering, and any posts that are included in the results will show up in the calendar. Note that Bricks’ filter elements will be targeting the posts from the loop, any recurring event from the same post would be included in the filtering.
Popup Templates
The calendar integrates with Bricks’ popup feature. When enabled, we can choose any popup template to display when the user clicks on any event on the calendar.
All dynamic tags inside the popup template will be populated by the content from that specific post clicked, so it’s ideal for displaying a ‘quick view’ with a custom layout. The data inside the popup will be coming from the post using Bricks’ dynamic tags.
Make sure to enable AJAX in your popup template settings.
Template settings > Popup > Fetch content via AJAX > Enable
And in the popup template, set the conditions to have it active on the page where you need it to show.
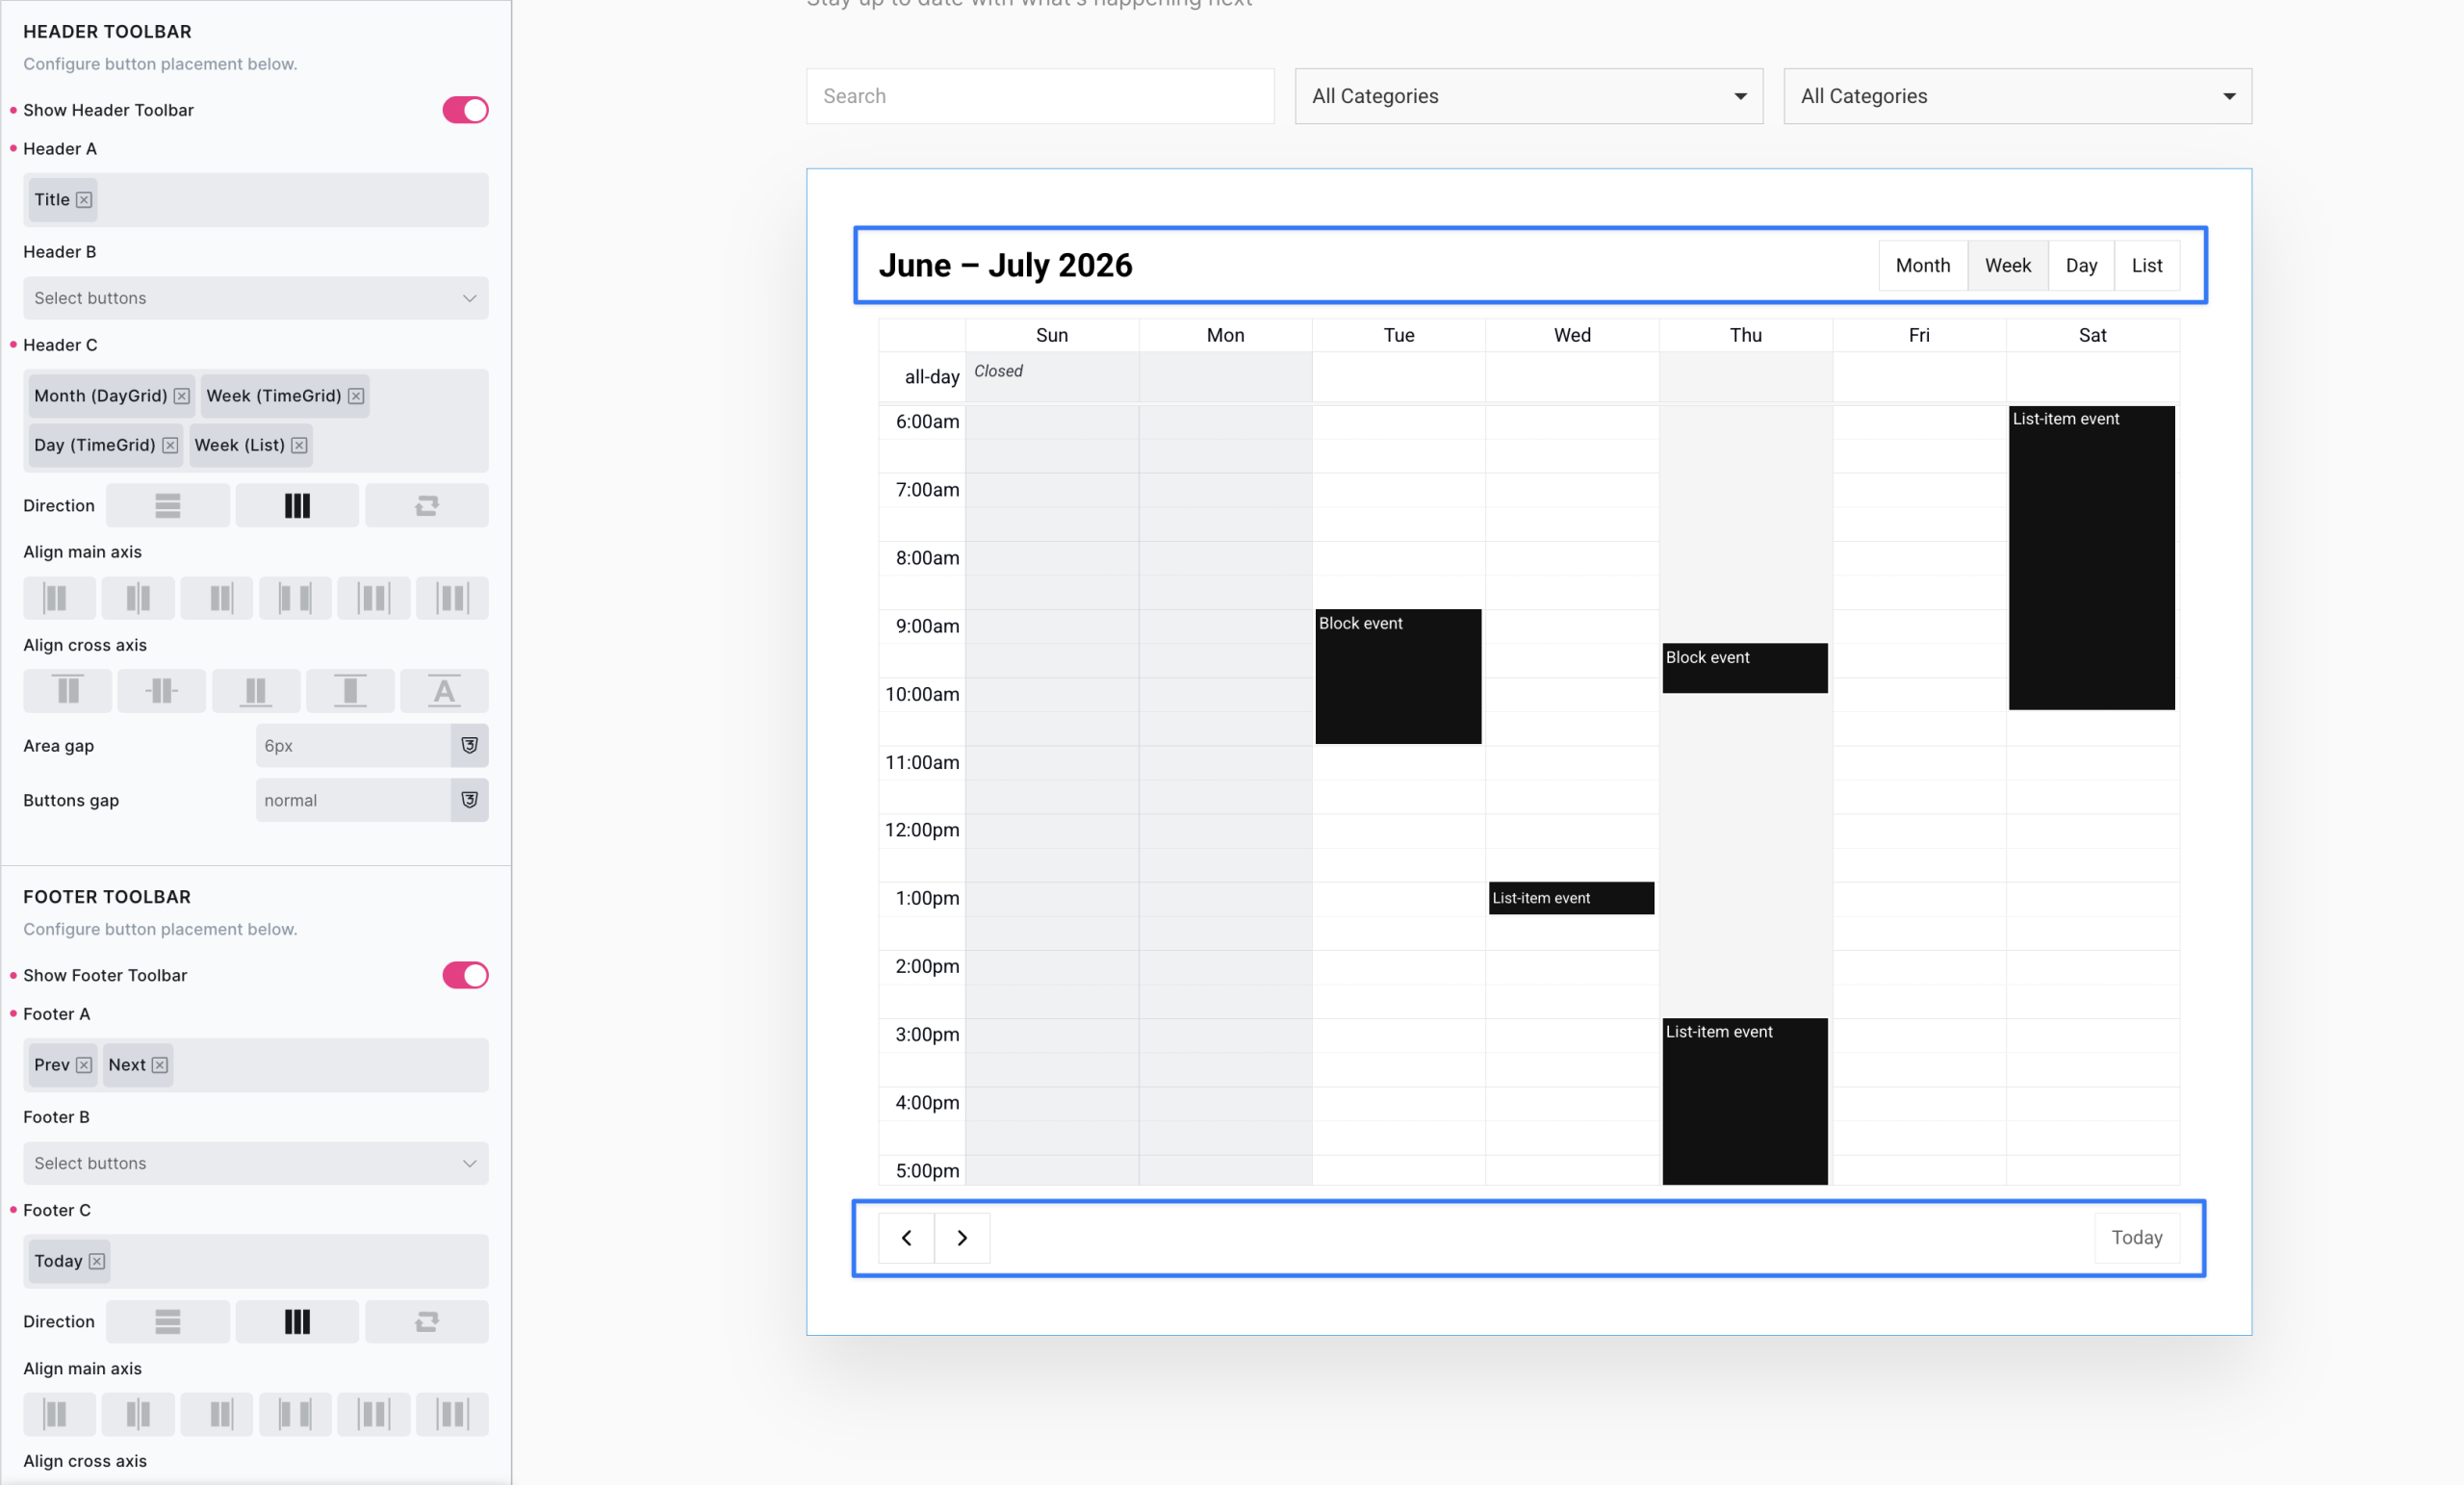
Header & Footer Toolbars
Above and below the calendar is the toolbars, each split into three zones. The buttons to change views, show adjacent months, the view title etc can be positioned anywhere within these zones.
Recurring Rules
For each item in the query loop, alongside providing the event data such as start date/time and end date/time, we also have the option to also add ‘recurring rules‘. This allows the same item to appear multiple times in the calendar. Ideal for showing recurring events, to be displayed repeatedly based on the set of rules.
Note that recurring rules are for when the same event needs to show up multiple times in the calendar.
Frequency – Defines how often the event repeats.
Interval – How many frequency periods between occurrences.
Count – Total number of occurrences
Until Date – End date for recurrence
By Day of Week – Which days of the week
By Day of Month – Which day(s) of the month
By Month – Which month(s) of the year
By Day of Year – Which day(s) of the year
By Week Number – Which week(s) of the year
By Position – Limits which occurrences from a set (for example, only first and last Monday of the month)
Start Date – Override the event’s start date for recurrence calculation if needed.
By combining rules, we can set up common recurring dates such as the following examples..
Every weekday
2nd Tuesday of each month
Last Friday of every month
Every 2 weeks from Monday
15th of every month for 12 months
Annual event until 2030
There’s also a seperate option for Exclusion Dates to add any specific dates that need to be excluded from the recurring rules (per event). For example, maybe the same event is happening every Friday but not on Friday 25th December.
1. Create Your Events
The calendar displays events from WordPress posts. You’ll need:
Minimum Requirements:
- Post Type (e.g., Events, CPT, or regular Posts)
- Title (post title)
- Start Date/Time field (ACF, Meta Box, etc.)
Optional Fields:
- End Date/Time field (if not provided, events show as single point in time)
- All-Day Event field (true/false)
- Color field (hex color for event styling)
- Post type taxonomies / custom fields (if using filtering)
2. Add the Calendar Element
- In Bricks, add the Calendar element to your page
- Enable Use query loop in the element settings
- Configure your query to fetch your event posts
3. Map Your Fields
- Title Field: Post title or any custom field
- Start Field: Your start date/time field
- End Field (optional): Your end date/time field
- All-Day Field (optional): true/false if event is all day (rather than a specific time)
- Color Field (optional): Color for this specific event to appear on the calendar.
4. Configure Recurring Events (Optional)
For events that need to repeat (weekly meetings, monthly events, etc.):
- Go to Recurring Rules tab
- Set Frequency (Daily, Weekly, Monthly, Yearly)
- Configure additional options via dynamic tags:
- By Day (e.g., Monday, Wednesday, Friday)
- By Month (e.g., April, May, July)
- Interval (every 2 weeks, every 3 months, etc.)
- Count or Until Date (when to stop recurring)
5. Style Your Calendar
Customize the appearance:
- Initial View: Month, Week, Day, List
- Available Views: Which view buttons to show
- First Day of Week: Sunday through Saturday
- Event Display: Auto, Block, or List Item (dot)
- Colors: Use CSS variables or the Color field
6. Add Filters (Optional)
Make your calendar filterable:
- Add Bricks Filter elements (Search, Select, etc.)
- Choose the calendar element from the Target query dropdown from the filter element settings.
- The calendar will update in real-time as users filter
The calendar automatically integrates with Bricks filters – no additional configuration needed!
Note that ‘Element Interactions’ must be enabled in BricksExtras > Misc settings.
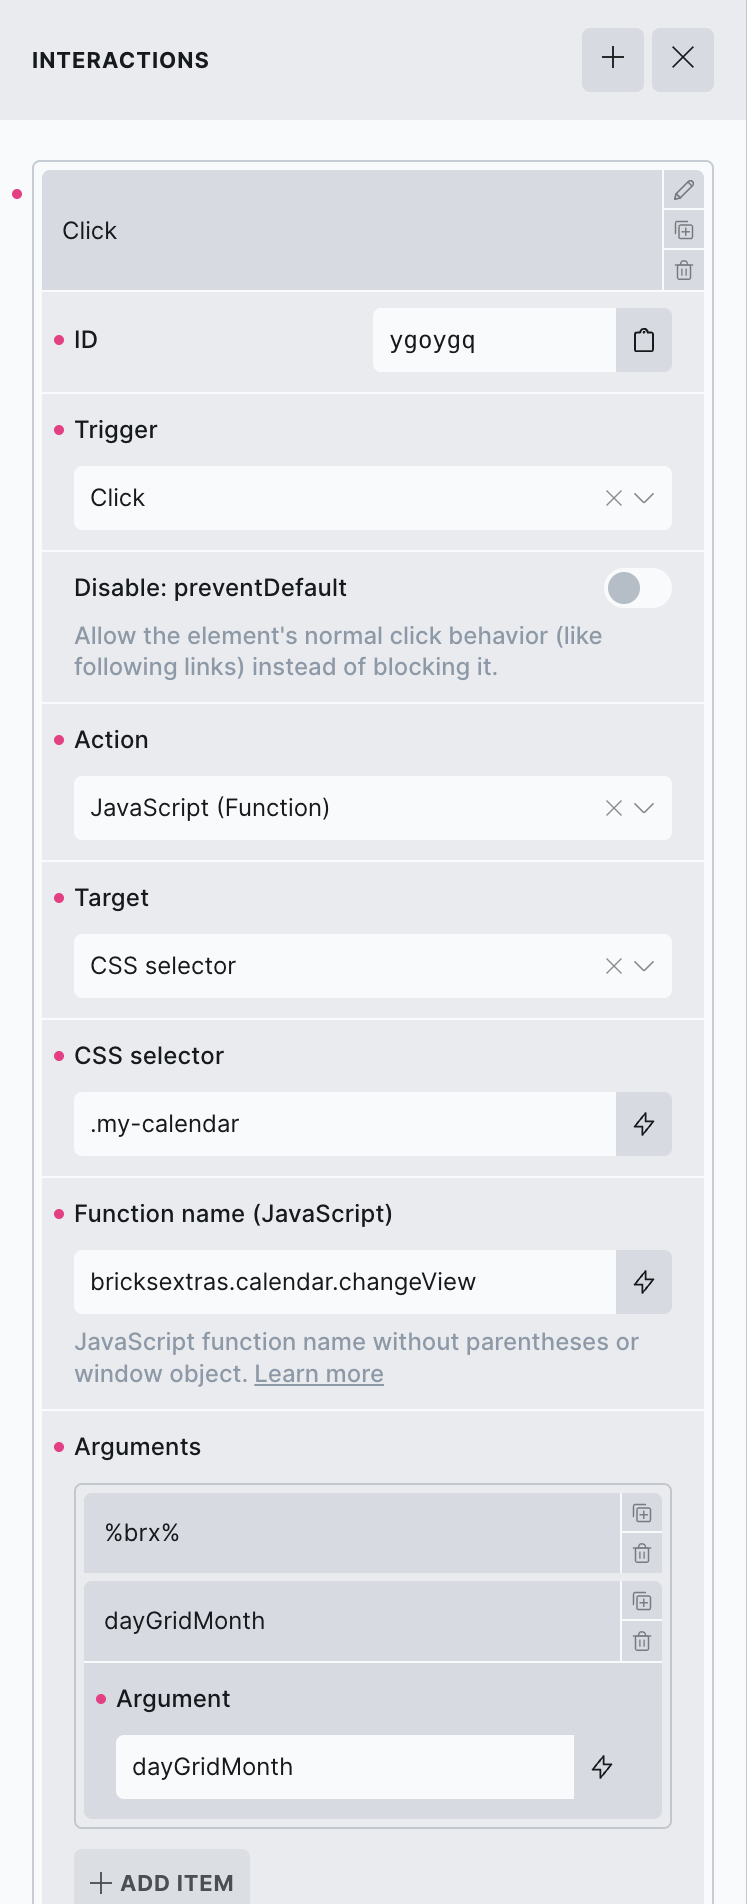
Actions
The element can be controlled with interactions (useful for adding your own buttons to control the calendar)
- Set the target to the calendar element using a CSS selector
- Use one of the following functions below to set the action
bricksextras.calendar.next – Will navigate forward one view range.
bricksextras.calendar.prev – Will navigate backward one view range.
bricksextras.calendar.nextYear – Will navigate forward one year.
bricksextras.calendar.prevYear – Will navigate backward one year.
bricksextras.calendar.today – Will navigate to today’s date.
bricksextras.calendar.gotoDate – Will navigate to a specific date. Pass the date as the second parameter (e.g. 2026-08-01).
bricksextras.calendar.view – Will switch to a specific calendar view. Pass the view name as the second parameter (e.g. dayGridMonth, timeGridWeek, timeGridDay, listWeek).
This element is powered by FullCalendar v7. Here’s how you can access the calendar instance.
Find the identifier from the data-x-id attribute on the element. For example, if your calendar element has the attribute data-x-id="auxrry", to get the calendar instance, you can do so like this:
const myCalendar = xCalendar.Instances.auxrryFrom there you have full access to the FullCalendar API. A useful example is navigating to a specific date programmatically:
const myCalendar = window.xCalendar.Instances.auxrry;

// Jump to a specific date
myCalendar.gotoDate('2026-12-25');
Other common uses:
// Switch to a different view
myCalendar.changeView('timeGridWeek');

// Move to the next month/period
myCalendar.next();

// Get all current events
const events = myCalendar.getEvents();
For changing which items are added to the calendar, everything is done through Bricks’ query loop. So for more advanced use cases, where something other than a simple post loop is needed to fetch the items, it’d be a case of customising Bricks’ query loop to output what you need. The calendar element controls the calendar behaviour, but Bricks’ query loop controls what is added to it.
JSON Array
As the calendar is populated by Bricks’ query loop, if you wanted to enter events in manually via an array (or this could be built with PHP) you can do, the end format would need to be like this..
[
  {
    "event_title": "Team Standup",
    "event_start": "2026-05-12T09:00:00",
    "event_end": "2026-05-12T09:30:00",
    "event_color": "#3b82f6",
    "event_url": "https://example.com/standup",
    "event_all_day": "false"
  },
  {
    "event_title": "Product Launch",
    "event_start": "2026-05-19",
    "event_end": "2026-05-20",
    "event_color": "#10b981",
    "event_url": "https://example.com/launch",
    "event_all_day": "true"
  }
]
And then use Bricks’ query_array dynamic tag for the field mapping.
(query_array @key:’event_title’)
(query_array @key:’event_start’)
..